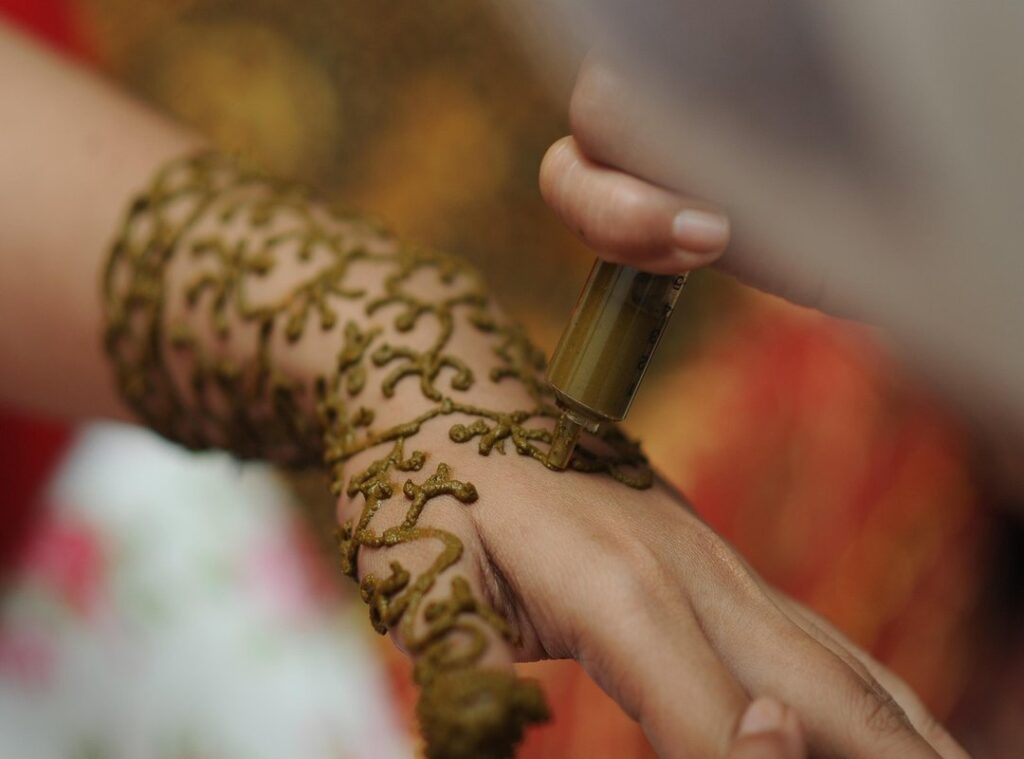
You want beautiful henna art, but those intricate designs can be a bit much. I get it. This guide is all about inai simple cantik—simple, beautiful henna that looks elegant and professional.
You don’t need to be a pro to create something stunning. Minimalism and clean lines are the way to go.
In this article, you’ll learn the design principles, prep steps, popular ideas, and aftercare tips for a vibrant, long-lasting stain. Let’s dive in.
What Makes a Henna Design Both Simple and Beautiful?
When it comes to henna, less is more. Minimalist henna art focuses on simplicity and elegance, making the design stand out without overwhelming the eye.
Negative space is key. The empty skin around the design makes the artwork pop and appear more refined. It’s like framing a beautiful picture with a simple, clean border.
Focusing on a single motif, such as a simple floral vine, a geometric pattern, or a small mandala, can create a stunning effect. You don’t need to cover the entire hand to make a statement.
Clean, confident linework is crucial. A simple design executed with steady hands looks more professional than a complex but shaky one. It’s all about precision and control.
| Element | Description |
|---|---|
| Dots | Small, round points that add texture and detail. |
| Lines | Smooth, continuous strokes that form the base of the design. |
| Teardrops | Elongated drops that add a touch of elegance. |
| Small Leaves | Tiny, leaf-like shapes that bring a natural, organic feel. |
These simple elements—dots, lines, teardrops, and small leaves—are the building blocks of elegant designs. Combine them creatively to achieve an inai simple cantik look that’s both minimal and beautiful.
By keeping your design simple and focusing on these core principles, you can create a henna masterpiece that’s both elegant and impactful.
Your 5-Step Guide to Preparing for Flawless DIY Henna
First things first, let’s talk about skin prep. You might think it’s overkill, but washing the area with soap and water and avoiding lotions or oils is crucial. It ensures a dark, even stain.
Trust me, you don’t want to skip this step.
Next up, choosing your henna. I can’t stress enough how important it is to source natural, high-quality henna cones. Avoid ‘black henna’ like the plague—it often contains dangerous chemicals like PPD.
Stick to the real stuff, and you’ll be much better off.
Now, the patch test. Apply a small dot of henna to your skin 24 hours in advance. This simple step can save you from a nasty allergic reaction.
It’s a no-brainer, really.
Practice makes perfect. Before you dive in, practice basic shapes like lines, dots, and swirls on a piece of paper. This helps you get a feel for the cone’s pressure and flow.
It’s all about building that muscle memory.
Finally, create a comfortable workspace. Set up in a well-lit area with paper towels, cotton swabs, and your design inspiration nearby. A smooth process starts with a good setup.
Oh, and one more thing—inai simple cantik. It’s a beautiful way to say “simple and pretty” in Malay. Keep that in mind as you embark on your henna journey. Aggr8Finance
Stunningly Simple Henna Ideas You Can Try Today
Let’s dive into some inai simple cantik designs that you can easily try at home.
First up, The Dainty Finger Vine. This design starts at the base of one finger and winds its way toward the nail, using small leaves and dots. It’s elegant and subtle.
Next, The Minimalist Wrist Cuff. Think of a simple band around your wrist, using geometric lines, dots, or a repeating scallop pattern. It gives a bracelet-like effect without the bulk.
Then there’s The Single Centerpiece. Place a single, well-placed design on the back of your hand, like a small mandala or a stylized flower. It’s a powerful statement in simplicity.
Lastly, Scattered Elements. Place a few tiny, separate elements—like three small dots near the cuticle, a star on the thumb, and a swirl on the side of the hand. It’s an artistic and unique look.
Mix and match these ideas. Take a finger design from one and a wrist element from another. The key is to have fun and make it your own.
Pro Tips for a Darker, Longer-Lasting Henna Stain
You want that henna design to last, right? The key is in the aftercare. Leave the dried henna paste on your skin for as long as possible.
Ideally, 6-8 hours or even overnight. This gives the henna time to fully stain the skin.
Now, here’s a trick you might not have heard before: the lemon-sugar sealant. Mix some lemon juice and sugar to create a simple paste. Dab it on the dried henna to keep it moist.
This can help darken the stain.
When it’s time to remove the henna, do it gently. Scrape or flake off the dried paste, and never wash it off with water initially.
Water can mess up the staining process and leave you with a lighter, less vibrant design.
Avoid getting the stained area wet for the first 12-24 hours. This allows the color to fully oxidize and darken. It’s a bit of a hassle, but trust me, it’s worth it.
After the paste is off, moisturize the design with a natural oil like coconut or olive oil. This protects the stain and makes it last longer.
Pro tip: Use inai simple cantik for an extra touch of care. It’s a traditional method that adds a beautiful, natural glow to your henna design.
Embrace Your Creativity with Simple Henna Art
Creating beautiful henna doesn’t require complexity, but rather a focus on clean lines, thoughtful placement, and proper care. The simple designs and tips provided are the perfect starting point for anyone new to DIY henna.
Feel empowered to pick one of the simple ideas and enjoy the relaxing, creative process of adorning your skin. inai simple cantik can be both a personal and artistic journey.
Stop waiting for the perfect occasion and start creating your own simple, beautiful henna art today.
 Carlabeth Mitchellers is the kind of writer who genuinely cannot publish something without checking it twice. Maybe three times. They came to financial planning essentials through years of hands-on work rather than theory, which means the things they writes about — Financial Planning Essentials, Wealth Management Techniques, Market Trends and Analysis, among other areas — are things they has actually tested, questioned, and revised opinions on more than once.
That shows in the work. Carlabeth's pieces tend to go a level deeper than most. Not in a way that becomes unreadable, but in a way that makes you realize you'd been missing something important. They has a habit of finding the detail that everybody else glosses over and making it the center of the story — which sounds simple, but takes a rare combination of curiosity and patience to pull off consistently. The writing never feels rushed. It feels like someone who sat with the subject long enough to actually understand it.
Outside of specific topics, what Carlabeth cares about most is whether the reader walks away with something useful. Not impressed. Not entertained. Useful. That's a harder bar to clear than it sounds, and they clears it more often than not — which is why readers tend to remember Carlabeth's articles long after they've forgotten the headline.
Carlabeth Mitchellers is the kind of writer who genuinely cannot publish something without checking it twice. Maybe three times. They came to financial planning essentials through years of hands-on work rather than theory, which means the things they writes about — Financial Planning Essentials, Wealth Management Techniques, Market Trends and Analysis, among other areas — are things they has actually tested, questioned, and revised opinions on more than once.
That shows in the work. Carlabeth's pieces tend to go a level deeper than most. Not in a way that becomes unreadable, but in a way that makes you realize you'd been missing something important. They has a habit of finding the detail that everybody else glosses over and making it the center of the story — which sounds simple, but takes a rare combination of curiosity and patience to pull off consistently. The writing never feels rushed. It feels like someone who sat with the subject long enough to actually understand it.
Outside of specific topics, what Carlabeth cares about most is whether the reader walks away with something useful. Not impressed. Not entertained. Useful. That's a harder bar to clear than it sounds, and they clears it more often than not — which is why readers tend to remember Carlabeth's articles long after they've forgotten the headline.